

In this guide, we'll walk you through building an AI-powered movie recommendation app. Unlike traditional keyword search, AI-powered search uses machine learning to return results based on the context and meaning behind queries.
You'll build a search and recommendation system using Meilisearch and OpenAI's embedding model. The app will offer a search-as-you-type experience, combining precise keyword matching with the deeper context of semantic search, helping users find relevant movies even when their queries don't exactly match movie titles or descriptions.
Additionally, the app will feature AI-powered recommendations, suggesting similar movies based on the user’s selection, to enhance their experience.
Whether you're new to Meilisearch or expanding your search skills, this tutorial will guide you through building a cutting-edge movie search and recommendation system. Let's get started!
Prerequisites
Before we begin, make sure you have:
- Node.js and npm (included with Node.js)
- A running v1.10 Meilisearch project — a search engine to create out-of-the-box relevant search experiences
- An API key from OpenAI to use their embedding models (at least a tier 2 key for optimal performance)
1. Set up Meilisearch
In this guide we'll use Meilisearch Cloud, as it's the easiest option get Meilisearch up and running fast. You can try it free for 14 days, no credit card required. It's also the recommended way to run Meilisearch in production environments.
If you prefer to run things on your own machine, no problem - Meilisearch is open-source, so you can install it locally.
1.1. Create a new index
Create an index called movies and add this movies.json to it. If necessary, follow the getting started guide.
Each document in the movies dataset represents a single movie and has the following structure:
id: a unique identifier for each movietitle: the title of the movieoverview: a brief summary of the movie's plotgenres: an array of genres that the movie belongs toposter: a URL to the movie's poster imagerelease_date: the release date of the movie, represented as a Unix timestamp
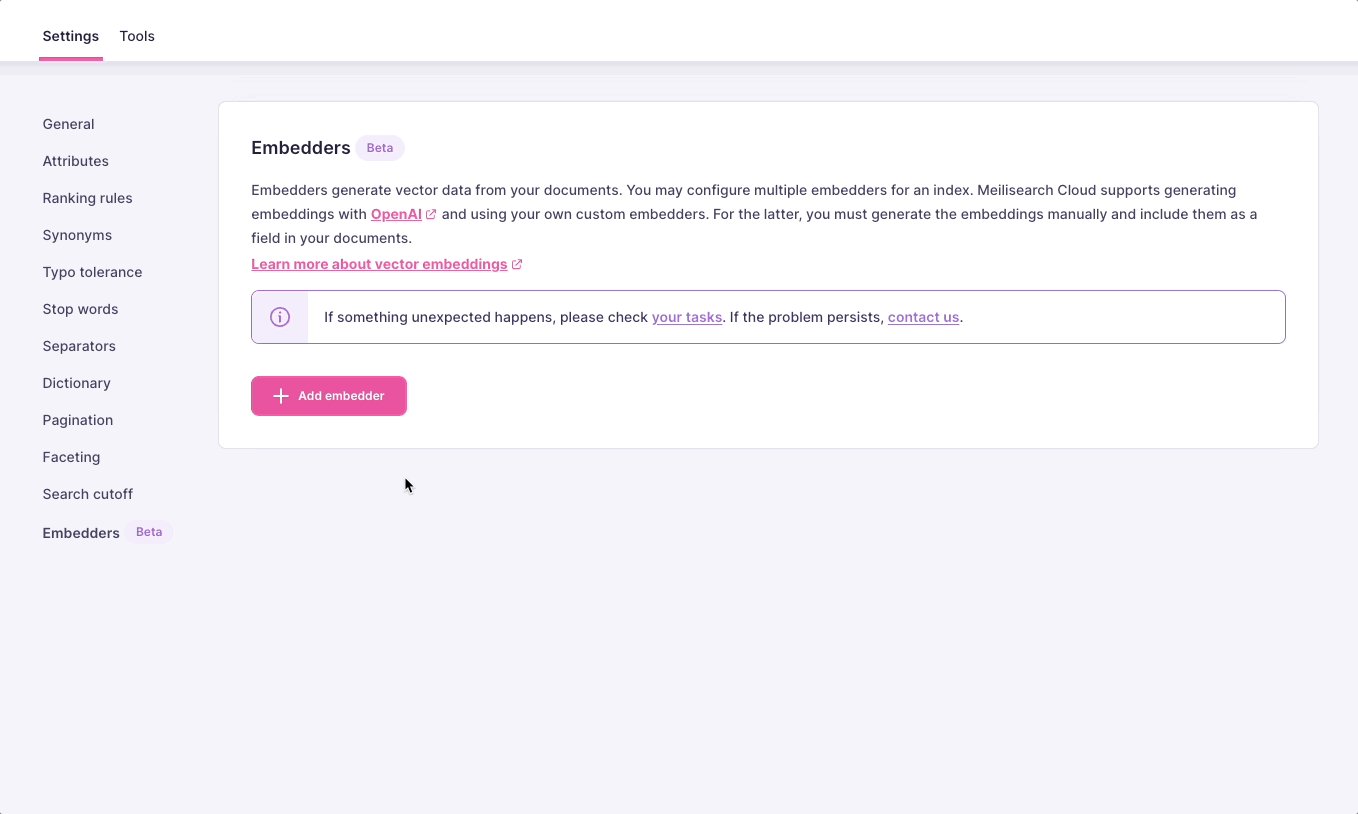
1.2. Activate AI-powered search
In the Meilisearch Cloud dashboard:
- Find the "Experimental features" section in your project settings
- Check the "AI-powered search" box

Alternatively, activate it via the API, using the experimental-features route.
1.3. Configure the embedder
To harness the power of AI-powered search, we need to configure an embedder for our index.
When we configure an embedder, we're telling Meilisearch how to convert our text data into embeddings–numerical representations of the text that capture its semantic meaning. This allows for semantic similarity comparisons, enabling our search to understand context and meaning beyond simple keyword matching.
We'll use OpenAI's model for this tutorial, but Meilisearch is compatible with various embedders. You can explore other options in our compatibility list. Don’t know which model to choose? We've got you covered, read our blog post on choosing the right model for semantic search.
Configure the embedder index setting:
- In the Cloud UI:
- Or via API:
curl -X PATCH 'https://ms-*****.sfo.meilisearch.io/indexes/movies/settings' \
-H 'Content-Type: application/json' \
-H 'Authorization: Bearer YOUR_MEILISEARCH_API_KEY' \
--data-binary '{
  "embedders": {
    "text": {
      "source": "openAi",
      "apiKey": "YOUR_OPENAI_API_KEY",
      "model": "text-embedding-3-small",
      "documentTemplate": "A movie titled '{{doc.title}}' that released in {{ doc.release_date }}. The movie genres are: {{doc.genres}}. The storyline is about: {{doc.overview|truncatewords: 100}}"
    }
  }
}'textis the name we have given to our embedder- Replace
https://ms-*****.sfo.meilisearch.iowith your project's URL - Replace
YOUR_MEILISEARCH_API_KEYandYOUR_OPENAI_API_KEYwith your actual keys - The
modelfield specifies the OpenAI model to use - The
documentTemplatefield customizes the data sent to the embedder
2. Create a React app
Now that our Meilisearch backend is configured, let's set up the frontend of our AI-powered search application using React.
2.1. Set up the project
We’ll use a Vite template to create a new React project with a basic structure, setting us up for rapid development.
npm create vite@latest movie-search-app -- --template react
cd movie-search-app
npm install
2.2. Install the Meilisearch client
Next, we need to install the Meilisearch JavaScript client to interact with our Meilisearch backend:
npm install meilisearch2.3. Add Tailwind CSS
For styling, we'll use Tailwind CSS. Instead of installing it as a dependency, we'll use the Tailwind CSS Play CDN for simplicity. Add the following script tag to the <head> of your index.html file:
<!doctype html>
<html lang="en">
  <head>
    <meta charset="UTF-8" />
    <link rel="icon" type="image/svg+xml" href="/vite.svg" />
    <meta name="viewport" content="width=device-width, initial-scale=1.0" />
    <title>AI-Powered movie search</title>
    <script src="https://cdn.tailwindcss.com"></script>
  </head>
  <body>
    <div id="root"></div>
    <script type="module" src="/src/main.jsx"></script>
  </body>
</html>
We've also updated the <title> tag to reflect our app's purpose.
2.4. Verify the setup
To ensure everything is set up correctly, start the development server:
npm run devYou should see a URL (usually http://localhost:5173) where you can view your app in the browser. If you see the Vite + React welcome page, you're all set!
With these steps completed, we have a React project ready for building our AI-powered movie search interface. In the next sections, we'll start implementing the search functionality using Meilisearch.
3. Build an AI-powered search experience
Hybrid search combines traditional keyword search with AI-powered semantic search. Keyword search is great for precise matches, while semantic search understands context. By using both, we get the best of both worlds - precise results and contextually relevant matches.
3.1. Create a MovieSearchService.jsx file
We have a Meilisearch instance running, and to interact with it, we create a MovieSearchService.jsx file in our src directory. This service acts as a client-side interface to our Meilisearch backend, providing essential search-related functionality for our movie database.
First, we need to add the Meilisearch credentials to an .env file. You can find the Database URL (your host) and Default Search API Key on your Meilisearch Cloud project’s Settings page.
VITE_MEILISEARCH_HOST=https://ms-************.sfo.meilisearch.io
VITE_MEILISEARCH_API_KEY='yourSearchAPIKey'
Note that variables in Vite projects must be prefixed with VITE_ to be accessible in the application code.
Now, let’s create the Meilisearch client to connect to the Meilisearch instance:
// src/MovieSearchService.jsx
import { MeiliSearch } from 'meilisearch';

const client = new MeiliSearch({
  host: import.meta.env.VITE_MEILISEARCH_HOST || 'http://localhost:7700',
  apiKey: import.meta.env.VITE_MEILISEARCH_API_KEY || 'yourSearchAPIKey',
});

// We target the 'movies' index in our Meilisearch instance.
const index = client.index('movies');
Next, let’s create a function to perform a hybrid search:
// src/MovieSearchService.jsx

// ... existing search client configuration

const hybridSearch = async (query) => {
  const searchResult = await index.search(query, {
    hybrid: {
      semanticRatio: 0.5,
      embedder: 'text',
    },
  });
  return searchResult;
};

export { hybridSearch }
When adding the hybrid parameter to the search query, Meilisearch returns a mix of semantic and full-text matches.
The semanticRatio determines the balance between keyword and semantic search, with 1 being full semantic and 0 full keyword. A ratio of 0.5 means the results will be equally influenced by both methods. Adjusting this ratio allows you to fine-tune the search behavior to best suit your data and user needs.
The embedder specifies the configured embedder. Here, we are using the text embedder configured in step 1.3.
3.2. Create the search UI components
First, let's create a dedicated directory for our components src/components to keep our project clean and manageable as it grows.
3.2.1. The search input
Now, we can create our search input component. This will be the main interface for users to interact with our AI-powered search. Create a new file SearchInput.jsx in the src/components directory:
// src/components/SearchInput.jsx
import React from 'react';
const SearchInput = ({ query, setQuery }) => {
return (
<div className="relative">
<input
type="text"
value={query}
onChange={(e) => setQuery(e.target.value)}
placeholder="Search for movies..."
className="px-6 py-4 w-full my-2 border border-gray-300 rounded-md pr-10"
/>
{/* Clear button appears when there's any text in the input (query is truthy) */}
{query && (
// Clicking the clear button sets the query to an empty string
<button
onClick={() => setQuery('')}
className="absolute right-6 top-1/2 transform -translate-y-1/2 text-gray-500 hover:text-gray-700"
>
✕
</button>
)}
</div>
);
};
export default SearchInputThe SearchInput component takes two props: query and setQuery. The input field's value is controlled by the query prop. When the user types in the input, it triggers the onChange event, which calls setQuery with the new value.
A clear button (❌) appears when there's any text in the input (when query is truthy). Clicking this button sets the query to an empty string, effectively clearing the input.
We'll control the state and behavior of the query and setQuery props in the parent component App.jsx.
3.2.2. The result card
Now that we have a search bar, we need a component to display the search results. Let's create a ResultCard component to showcase each movie returned by our search.
Create a new file ResultCard.jsx in the src/components directory:
// src/components/ResultCard.jsx
const ResultCard = ({ url, title, overview }) => {
    return (
      <div className='flex w-full sm:w-1/2 md:w-1/3 lg:w-1/4 p-3'>
        <div className='flex-1 rounded overflow-hidden shadow-lg'>
          <img
            className='w-full h-48 object-cover'
            src={url}
            alt={title}
          />
          <div className='px-6 py-3'>

            <div className='font-bold text-xl mb-2 text-gray-800'>
              {title}
            </div>
            <div className='font-bold text-sm mb-1 text-gray-600 truncate'>
              {overview}
            </div>
          </div>
        </div>
      </div>
    )
  }

  export default ResultCard
This component takes url, title, and overview as props. The component shows the movie poster using the url prop, followed by the title and a truncated overview, providing a compact preview of each movie.
3.3. Integrate search and UI in the main App component
Let's update the App.jsx component to tie everything together, handling the search logic and rendering the UI.
// src/App.jsx

// Import necessary dependencies and components
import { useState, useEffect } from 'react'
import './App.css'
import { hybridSearch } from './MovieSearchService';
import SearchInput from './components/SearchInput';
import ResultCard from './components/ResultCard'

function App() {
  const [query, setQuery] = useState('');
  const [results, setResults] = useState([]);
  const [isLoading, setIsLoading] = useState(false);
  const [error, setError] = useState(null);

  useEffect(() => {
    async function performSearch() {
      setIsLoading(true);
      setError(null);
      try {
        const response = await hybridSearch(query);
        setResults(response.hits);
      } catch (err) {
        setError('An error occurred while searching. Please try again.');
        console.error('Search error:', err);
      } finally {
        setIsLoading(false);
      }
    }

    performSearch();
  }, [query]);

  return (
    <div className='container w-10/12 mx-auto'>
    <SearchInput
      query={query}
      setQuery={setQuery}
    />
    {isLoading && <p>Loading...</p>}
    {error && <p className="text-red-500">{error}</p>}
    <div className='flex flex-wrap'>
    {results.map((result) => (
      <ResultCard
      url={result.poster}
      title={result.title}
      overview={result.overview}
      key={result.id}
      />
    ))}
    </div>
    </div>
  );
}

export default App
We use several state variables:
query: stores the current search queryresults: holds the search resultsisLoading: indicates when a search is in progresserror: stores any error messages
The core of the component is a useEffect hook that triggers a performSearch function whenever the query changes. This function manages the search process, including setting loading states, calling the hybridSearch function, updating results, and handling any errors.
In the render method, we structure our UI with the SearchInput component at the top, followed by loading and error messages when applicable. The search results are displayed as a grid of ResultCard components, mapping over the results array.
4. Build the movie recommendation system
Now that we've implemented the search logic, let's enhance our application with a recommendation system. Meilisearch offers an AI-powered similarity search feature through its /similar route. This feature allows us to retrieve a number of documents that are similar to a target document, which is perfect for creating movie recommendations.
Let's add this functionality to our MovieSearchService.jsx:
// src/MovieSearchService.jsx

// ... existing search client configuration and hybridSearch function

const searchSimilarMovies = async (id, limit = 3, embedder = 'text') => {
  const similarDocuments = await index.searchSimilarDocuments({id, limit, embedder });
  return similarDocuments;
};

export { hybridSearch, searchSimilarMovies }
The searchSimilarDocuments index method takes the id of the target movie and the embedder name as parameters. It can also can be used together with other search parameters such as limit to control the number of recommendations.
4.1. Create a modal to display the recommendations
Let’s create a modal to display movie details and recommendations. A modal allows us to show more information without navigating away from the search results, which improves user experience by maintaining context.
//src/components/MovieModal.jsx

import React, { useEffect, useRef } from 'react';
import ResultCard from './ResultCard';

const MovieModal = ({ movie, similarMovies, onClose }) => {
  const modalRef = useRef(null);

  useEffect(() => {
    const handleEscape = (e) => {
      if (e.key === 'Escape') onClose();
    };
    document.addEventListener('keydown', handleEscape);
    modalRef.current?.focus();
    return () => document.removeEventListener('keydown', handleEscape);
  }, [onClose]);

  return (
    <div className="fixed inset-0 bg-black bg-opacity-80 flex items-center justify-center p-4 z-50"
         role="dialog"
         aria-modal="true"
         aria-labelledby="modal-title">
      <div ref={modalRef}
           className="bg-white rounded-lg p-6 max-w-4xl w-full max-h-[95vh] overflow-y-auto"
           tabIndex="-1">
        <h2 id="modal-title" className="text-2xl font-bold mb-4">{movie.title}</h2>
        <div className="flex mb-4">
          <div className="mr-4">
            <img
              className='w-48 object-cover'
              src={movie.poster}
              alt={movie.title}
            />
          </div>
          <div className="flex-1">
            <p>{movie.overview}</p>
          </div>
        </div>

        <h3 className="text-xl font-semibold mb-4">Similar movies</h3>
        <div className='flex flex-wrap justify-between'>
          {similarMovies.map((similarMovie, index) => (
            <ResultCard
              key={index}
              url={similarMovie.poster}
              title={similarMovie.title}
            />
          ))}
        </div>

        <button
          onClick={onClose}
          className="absolute top-2 right-2 w-10 h-10 flex items-center justify-center text-gray-500 hover:text-gray-700 bg-gray-200 rounded-full" // Added background and increased size
          aria-label="Close modal"
        >
          <svg xmlns="http://www.w3.org/2000/svg" className="h-6 w-6" fill="none" viewBox="0 0 24 24" stroke="currentColor">
            <path strokeLinecap="round" strokeLinejoin="round" strokeWidth={2} d="M6 18L18 6M6 6l12 12" />
          </svg>
        </button>
      </div>
    </div>
  );
}

export default MovieModal;
This component takes 3 props:
movie: an object containing details of the selected movie. This prop is used to display the main content of the modal.similarMovies: an array of movie objects representing films similar to the main movie. We reuse ourResultCardcomponent to showcase each recommended movie.onClose: a function that is called when the modal should be closed. This function is triggered when the close button is clicked or when the 'Escape' key is pressed.
The useRef and useEffect hooks are used to manage focus and keyboard interactions, which are crucial for accessibility. The aria-* attributes further enhance the modal's accessibility for screen readers.
4.2. Implement modal functionality
Let’s update the main App.jsx component so we can call the similar movies function and open the modal when we click on a movie.
First let’s import the modal and the searchSimilarMovies function we created earlier:
// src/App.jsx
// ... existing imports
import MovieModal from './components/MovieModal';
import { hybridSearch, searchSimilarMovies } from './MovieSearchService';
Add state for selectedMovie using useState:
// src/App.jsx
// ... existing state ...
const [selectedMovie, setSelectedMovie] = useState(null);
This creates a state variable to store the currently selected movie, initially set to null, and a function to update it.
Next, let’s create 2 functions:
handleMovieClickto update theselectedMoviestate with the movie that was clicked, enabling the modal to display the selected movie's detailscloseModalto reset theselectedMoviestate tonull
const handleMovieClick = (movie) => {
  setSelectedMovie(movie);
};

const closeModal = () => {
  setSelectedMovie(null);
};
Now, we can update the ResultCard component to trigger the handleMovieClick function when clicked and add the MovieModal component to the JSX, conditionally rendering it when a movie is selected.
// src/ ResultCard.jsx
const ResultCard = ({ url, title, overview, onClick }) => {
    return (
      <div className='flex w-full sm:w-1/2 md:w-1/3 lg:w-1/4 p-3' onClick={onClick}>
        <div className='flex-1 rounded overflow-hidden shadow-lg'>
          <img
            className='w-full h-48 object-cover'
            src={url}
            alt={title}
          />
          <div className='px-6 py-3'>

            <div className='font-bold text-xl mb-2 text-gray-800'>
              {title}
            </div>
            <div className='font-bold text-sm mb-1 text-gray-600 truncate'>
              {overview}
            </div>
          </div>
        </div>
      </div>
    )
  }

  export default ResultCard
    // src/App.jsx
    // ... in the return statement
    <div className='flex flex-wrap'>
    {results.map((result) => (
      <ResultCard
      url={result.poster}
      title={result.title}
      overview={result.overview}
      key={result.id}
      onClick={() => handleMovieClick(result)}
      />
    ))}
    </div>
    {selectedMovie && (
      <MovieModal
        movie={selectedMovie}
        onClose={closeModal}
      />
    )}
    </div>
Let’s create a new state variable similarMovies (initially an empty array) and its setter function setSimilarMovies to store and update the list of movies similar to the selected one.
const [similarMovies, setSimilarMovies] = useState([]);Now, we need to udpate the handleMovieClick function to also fetch similar movies, and update the similarMovies state with the results, which we will pass on to the modal.
const handleMovieClick = async (movie) => {
  setSelectedMovie(movie);
  try {
    const similar = await searchSimilarMovies(movie.id);
    setSimilarMovies(similar.hits);
  } catch (err) { // error handling for the API call.
    console.error('Error fetching similar movies:', err);
    // Avoid broken content by setting `similarMovies` to an empty array
    setSimilarMovies([]);
  }
};

// ... existing code ...

<MovieModal
  movie={selectedMovie}
  similarMovies={similarMovies}
  onClose={closeModal}
/>
Finally, we need to update the closeModal to reset similarMovies state variable:
  const closeModal = () => {
    setSelectedMovie(null);
    setSimilarMovies([]);
  };
5. Run the application
Start the development server and enjoy!
npm run dev
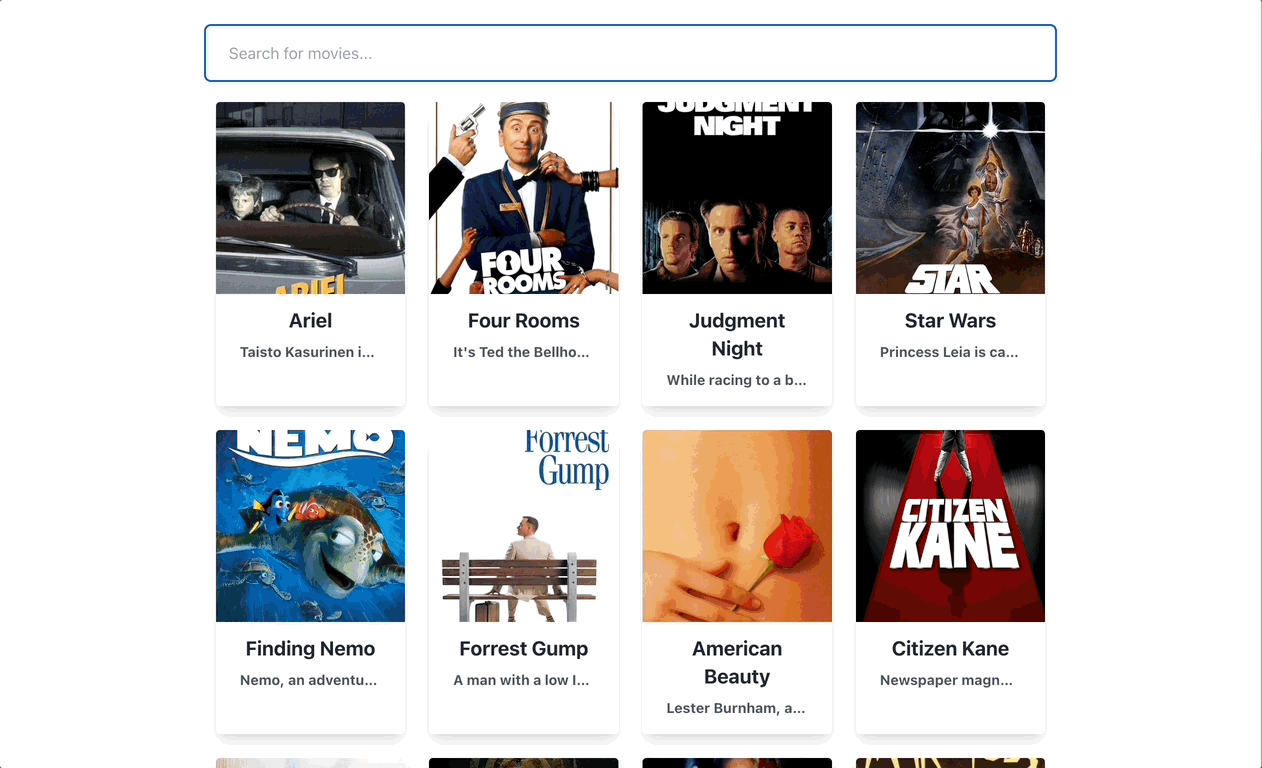
Our app should look like this:
Conclusion
Congratulations! You've successfully built an AI-powered movie search and recommendation system using Meilisearch and React. Let's recap what you've accomplished:
- Set up a Meilisearch project and configured it for AI-powered search
- Implemented hybrid search combining keyword and semantic search capabilities
- Created a React UI for searching movies
- Integrated Meilisearch's similarity search for movie recommendations
What's next?
To improve user experience and allow for more precise searching, you could set a faceted search interface to allow users filter movies by genre or sort them by release date.
When you're ready to build an app with your own data, make sure to configure your index settings first to follow best practices. This will optimize indexing performance and search relevancy.
When you're ready to build an app with your own data, make sure to configure your index settings first to follow best practices. This will optimize indexing performance and search relevancy, ensuring your app runs smoothly and provides accurate results.
Meilisearch is an open-source search engine with intuitive developer experience to build user-facing search. You can self-host it or get a premium experience with Meilisearch Cloud.
For more things Meilisearch, you can join the community on Discord or subscribe to the newsletter. You can learn more about the product by checking out the roadmap and participating in product discussions.