
Search is an integral part of online shopping. Forrester, a research company focusing on customer experience, reports that visitors using onsite search convert almost two times more and spend more time shopping. But poor search results are known to reduce sales and brand trust. Ecommerce site search needs to be fast, relevant, and tailored to your business’ specific needs.
In this guide, we’ll walk you through building a search experience for an ecommerce site using Nuxt 3, a JavaScript framework.
This guide is divided in three sections:
- Setting up the full-text search database
- Building a “type as you search” experience
- Refining search results with filters and facets
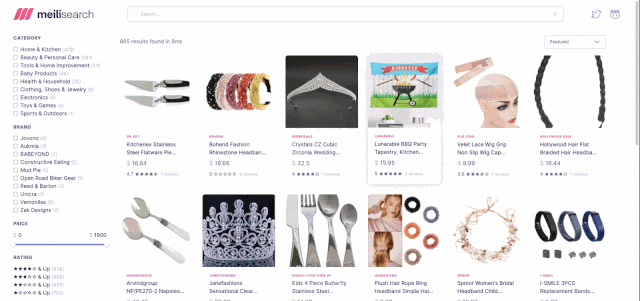
The code in this guide is also available in a GitHub repository with different checkpoints to help you follow along. At the end of this guide, our application will look like this:
Contents
- Requirements
- Setting up Meilisearch full-text search database
- Building a “search as you type” experience
- Advanced search patterns with sorting, facets, and pagination
Requirements
To build our Nuxt web application connecting to a Meilisearch database, we will use:
- Node 18 or newer — We recommend using nvm to easily switch versions
- yarn 3 — A package manager for Node.js
- Nuxt 3 — A framework for building production applications with Vue 3 and TypeScript
- Meilisearch 1.3 — A search engine to create out-of-the-box relevant search experiences
To focus on search-related matters, we’ll use a template repository. This repository contains UI components to build a traditional ecommerce layout. Let’s start by cloning it:
git clone https://github.com/meilisearch/ecommerce-demoThen, let’s install our dependencies:
# Navigate to the project directory
cd ecommerce-demo

# Make sure to use Node.js 18.x before installing dependencies!
# nvm use v18

# Install dependencies
yarn
When the installation completes, we’re ready to jump in and set up our database.
Setting up Meilisearch full-text search database
Before building our front-end app, we will initialize our Meilisearch database. In this first section, we will:
- Launch a Meilisearch database
- Import our dataset in a products index
- Configure our Meilisearch instance for ecommerce search
If you are using this tutorial’s repository, checkout the 1-setup-database branch:
git checkout 1-setup-databaseLaunching a Meilisearch database
The easiest way to spawn a Meilisearch instance is using Meilisearch Cloud. There's a free 14-day trial, no credit card required. Meilisearch is open-source, so if you prefer to run it locally, you can refer to the documentation on local installation. In this guide, we’ll use the Meilisearch Cloud.
Next, we need to create a Meilisearch Cloud account. After logging in, we land on the Projects page. From there, create a project to spawn a new database (give it a cool name like awesome-ecommerce-tutorial 😏), select an engine version, and click Create–the database should be ready in a minute. Let’s move forward while the little Meili elves are plugging cables for us!
When the project is ready, we can access the Project Overview page to retrieve information that will be useful in the later sections:
- Database URL
- Default Search API Key
- Default Admin API Key
Importing our products dataset
Our repository contains a sample dataset of ecommerce products in database/data.json. We will import it to our database by creating a Meilisearch client in our database/setup.js file.
We also need to provide our application with the necessary credentials. To do this, we use a .env file located at the root of the project. .env files are a common way of storing credential variables and will be read by the code we add to database/setup.js.
First, duplicate the existing .env.example file, and rename it as .env. Then, update the variables to match the credentials found on your Project Overview page. Update the Meilisearch-related variables so your .env file looks like this:
# .env

# Meilisearch configuration
MEILISEARCH_HOST="use the Database URL here"
MEILISEARCH_ADMIN_API_KEY="use the Default Admin API Key here"
MEILISEARCH_SEARCH_API_KEY="use the Default Search API Key here"

# …
Now that our environment holds our database credentials, we can create a Meilisearch client to add content to our database, a process called seeding. With Meilisearch, actions performed against the database are asynchronous—we call them tasks. We’ll use a watchTasks helper function to wait for tasks to be complete before exiting our script.
The following code in database/setup.js sends data stored in database/data.json to Meilisearch:
// database/setup.js

import * as dotenv from 'dotenv'
import { MeiliSearch } from 'meilisearch'
import { watchTasks } from './utils.js'
import data from './data.json' assert { type: 'json' }

// Load environment
dotenv.config()

const credentials = {
  host: process.env.MEILISEARCH_HOST,
  apiKey: process.env.MEILISEARCH_ADMIN_API_KEY
}

const INDEX_NAME = 'products'

const setup = async () => {
  console.log('🚀 Seeding your Meilisearch instance')

  if (!credentials.host) {
    console.error('Missing `MEILISEARCH_HOST` environment variable')
    process.exit(1)
  }
  if (!credentials.apiKey) {
    console.error('Missing `MEILISEARCH_ADMIN_API_KEY` environment variable')
    process.exit(1)
  }

  const client = new MeiliSearch(credentials)

  console.log(`Adding documents to \`${INDEX_NAME}\``)
  await client.index(INDEX_NAME).addDocuments(data)

  await watchTasks(client, INDEX_NAME)
}

setup()
Use Yarn to run our setup script:
yarn setupYou should see an output similar to the following:
🚀 Seeding your Meilisearch instance
Adding documents to `products`
Start update watch for products
-------------
products index: adding documents
-------------
All documents added to "products"
✨  Done in 2.92s.
If it works, congrats—we’ve connected to Meilisearch and imported our data. 🎉

Configuring Meilisearch for ecommerce
Meilisearch comes with great defaults for search, including tolerance to typos and pre-defined ranking rules to optimize relevancy. Other key features for ecommerce search include sorting and filtering. Moreover, depending on marketing campaigns, partnerships, or <insert business reason>, you might want to implement custom ranking rules.
You can customize Meilisearch by tweaking database settings. We’ll do this in our database/setup.js file.
First, let’s decide on a configuration:
- Filtering: we want products to be filterable by brand, category, tag, rating, reviews count, and price;
- Sorting: we want products to be sortable by price or by rating;
- Ranking: we want the algorithm to prioritize sorting over the rest (on a real shop, you might want featured products to come first.)
We can implement this in our database/setup.js file. We’ll update our setup() function body to look like this:
// database/setup.js

// …

const setup = async () => {
  // Credentials verification code…

  const client = new MeiliSearch(credentials)

  console.log(`Adding filterable attributes to \`${INDEX_NAME}\``)
  await client.index(INDEX_NAME).updateFilterableAttributes([
    'brand',
    'category',
    'tag',
    'rating',
    'reviews_count',
    'price'
  ])

  console.log(`Adding ranking rules to \`${INDEX_NAME}\``)
  await client.index(INDEX_NAME).updateRankingRules([
    'sort',
    'words',
    'typo',
    'proximity',
    'attribute',
    'exactness'
  ])

  console.log(`Adding sortable attributes to \`${INDEX_NAME}\``)
  await client.index(INDEX_NAME).updateSortableAttributes([
    'rating',
    'price'
  ])

  // Adding documents and watching tasks…
}

setup()In the code above, we updated:
- filterable attributes — which enables filtering and faceted search;
- ranking rules — we kept the Meilisearch defaults, but moved sort at the top;
- sortable attributes — to enable sorting of results.
And with this, we’ve now completed our Meilisearch database setup. ✅ So, let’s start building our Nuxt 3 ecommerce site, shall we?
Building a “search as you type” experience
If you are following along with the git repository, checkout the 2-search-as-you-type branch:
git checkout "2-search-as-you-type"Before proceeding, make sure MEILISEARCH_SEARCH_API_KEY is defined in our .env file.
Creating the Meilisearch client
We have a Meilisearch database running, but we still need a client application to interact with it. If we take a look at our package.json, we see that we have two libraries to work with:
vue-instantsearch(Vue InstantSearch) to build UI components that interact with our search client;@meilisearch/instant-meilisearch(Instant Meilisearch) to create a Meilisearch client compatible with InstantSearch.
We need a component to handle authentication to our database and make search-related state available in other parts of our application. Let’s do this in our MeiliSearchProvider.vue component. It will take the index name as prop, and include a slot to wrap children components that will have access to the state.
<!-- components/organisms/MeiliSearchProvider.vue -->

<script lang="ts" setup>
import { instantMeiliSearch } from '@meilisearch/instant-meilisearch'
import { AisInstantSearch } from 'vue-instantsearch/vue3/es'

const props = defineProps<{
  indexName: string
}>()

const { indexName } = toRefs(props)

const { host, searchApiKey, options } = useRuntimeConfig().meilisearch

const searchClient = instantMeiliSearch(host, searchApiKey, options)
</script>

<template>
  <AisInstantSearch :index-name="indexName" :search-client="searchClient">
    <slot name="default" />
  </AisInstantSearch>
</template>
Our component is essentially a wrapper around the AisInstantSearch component. AisInstantSearch is the basis for integrations based on InstantSearch: it handles authentication and makes state available to other InstantSearch components. Our code does three things:
- Pull the credentials and options from the runtime configuration
- Create an InstantMeilisearch client (that is, a Meilisearch client compatible with InstantSearch)
- Instantiate a Vue InstantSearch component
We will use this component at the root of our home page, in HomeTemplate.vue. But alone, this component won’t be able to do much. So let’s implement our search bar and results before we can tie everything up.
Sending queries with a search barOur application needs a search bar for users to type their queries.
We’ll update our MeiliSearchBar.vue component to handle this. In this component, we will send the content of the input field as a query to our Meilisearch database. Thanks to the existing SearchInput component, our code can be pretty simple:
<!-- components/organisms/MeiliSearchBar.vue -->

<script lang="ts" setup>
import { AisSearchBox } from 'vue-instantsearch/vue3/es'
</script>

<template>
  <AisSearchBox>
    <template #default="{ currentRefinement, refine }">
      <SearchInput
        :value="currentRefinement"
        @input="refine($event.currentTarget.value)"
      />
    </template>
  </AisSearchBox>
</template>
Our component uses slot props from AisSearchBox. Slot props allow parent components to access state managed in the child scope. Here, these slot props give us access to the search-related state, enabling us to build custom UI. With this, we’re able to send requests to our Meilisearch database. Which means only one thing is missing now—displaying search results.
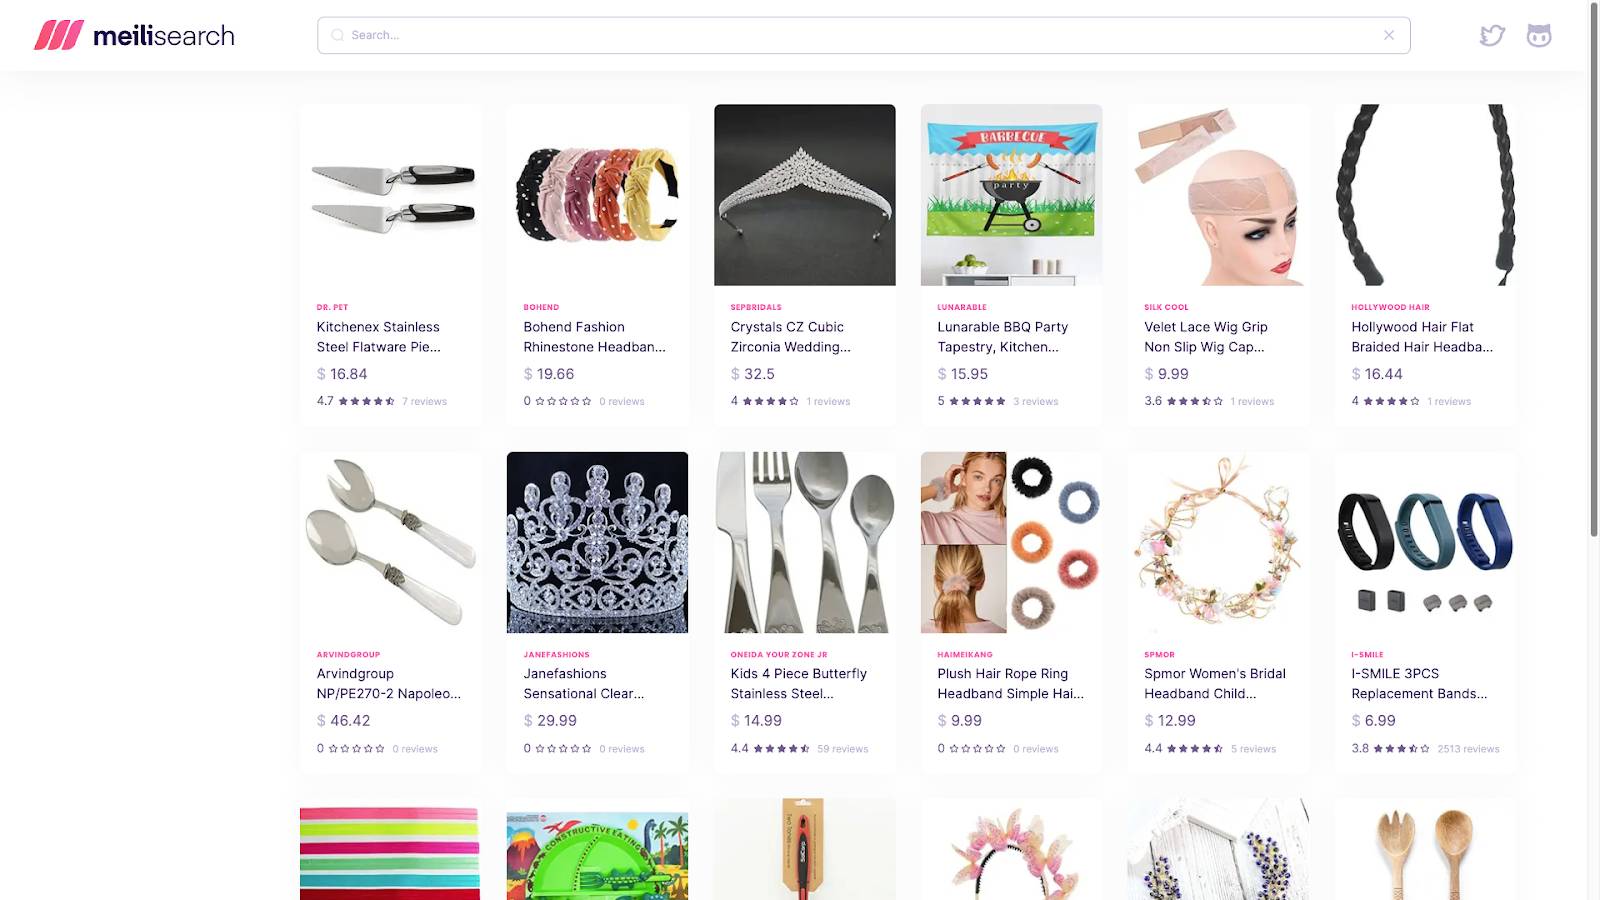
Displaying search results
Finally, let’s update our `MeiliSearchResults.vue` component to display the results from our search. We will display results in a standard grid layout. We can make use of the ProductCard component:
<!-- components/organisms/MeiliSearchResults.vue -->

<script lang="ts" setup>
import { AisHits } from 'vue-instantsearch/vue3/es'
</script>

<template>
  <AisHits>
    <template #default="{ items }">
      <div class="items">
        <ProductCard
          v-for="product in items"
          :key="product.id"
          :name="product.title"
          :brand="product.brand"
          :price="product.price"
          :image-url="product.images[0]"
          :rating="product.rating"
          :reviews-count="product.reviews_count"
        />
      </div>
    </template>
  </AisHits>
</template>

<style src="~/assets/css/components/results-grid.css" scoped />
Tying it up
We built three components: a search client provider, a search bar, and a search results grid. These components are used in HomeTemplate.vue. The lines using these components are currently commented out. As we progress through the guide, we will uncomment the corresponding lines to see our components in action.
Let’s check that our implementation is successful by uncommenting the lines using <MeiliSearchProvider/>, <MeiliSearchBar/>, and <MeiliSearchResults/>. Our code should look like the following:
<!-- components/templates/HomeTemplate.vue -->

<script lang="ts" setup>
const sortingOptions = [
  { value: 'products', label: 'Featured' },
  { value: 'products:price:asc', label: 'Price: Low to High' },
  { value: 'products:price:desc', label: 'Price: High to Low' },
  { value: 'products:rating:desc', label: 'Rating: High to Low' }
]
</script>

<template>
  <MeiliSearchProvider index-name="products">
    <TheNavbar class="mb-5 shadow-l">
      <template #search>
        <MeiliSearchBar />
      </template>
    </TheNavbar>
    <div class="container mb-5">
      <div class="filters">
        <!-- Removed for clarity -->
      </div>
      <div class="results">
        <div class="mb-5 results-meta">
          <!-- <MeiliSearchStats /> -->
          <!-- <MeiliSearchSorting /> -->
        </div>
        <MeiliSearchResults class="mb-5" />
        <!-- <MeiliSearchPagination /> -->
      </div>
    </div>
  </MeiliSearchProvider>
</template>

<style src="~/assets/css/components/home.css" scoped />
We now have the scaffolding of a basic Nuxt 3 application integrated with Meilisearch. To launch our app in development mode, run the following command:
yarn devBy default, the dev server URL is localhost:3000. We can open it in our browser and… tada 🎉 We should be able to type in the search box and see results appear:
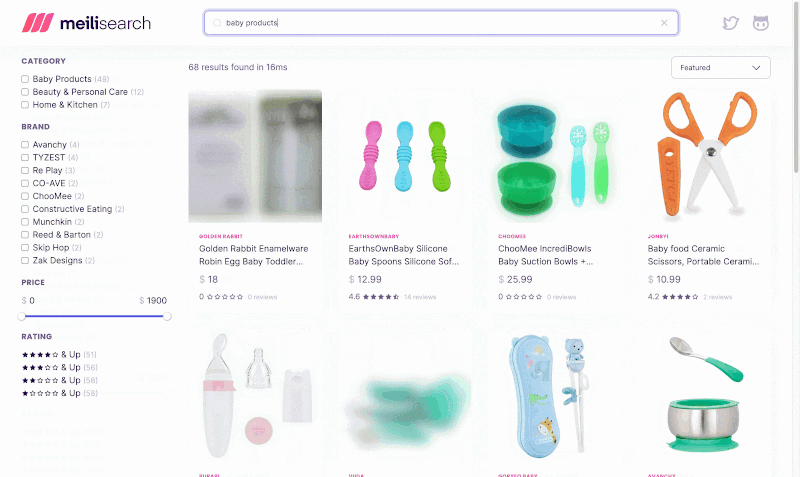
Alright. We’ve got a working application that allows searching for products in real time. Let’s add some shiny features that make it more suitable for real-world ecommerce. ✨
Advanced search patterns with sorting, facets, and pagination
If you are following along with the git repository, checkout the 3-advanced-search-patterns branch:
git checkout "3-advanced-search-patterns"Sorting results
Sorting is essential for navigating search results. For example, users might want to look at products sorted by price, or by rating. We’ll update our MeiliSearchSorting.vue component to allow users to change the sorting of the results, using our existing BaseSelect component. We’ll make it so the sorting options are received as props.
<!-- components/organisms/MeiliSearchSorting.vue -->

<script lang="ts" setup>
import { AisSortBy } from 'vue-instantsearch/vue3/es'

const props = defineProps<{
  options: Array<{
    value: string
    label: string
  }>
}>()

const { options } = toRefs(props)
</script>

<template>
  <AisSortBy :items="options">
    <template #default="{ items, refine }">
      <BaseSelect
        :options="items"
        @change="refine($event.target.value)"
      />
    </template>
  </AisSortBy>
</template>
If we take a look back at our HomeTemplate.vue file, we can see the following array is defined to be used for the options prop:
const sortingOptions = [
  { value: 'products', label: 'Featured' },
  { value: 'products:price:asc', label: 'Price: Low to High' },
  { value: 'products:price:desc', label: 'Price: High to Low' },
  { value: 'products:rating:desc', label: 'Rating: High to Low' }
]
To see our sorting component in action, uncomment the line that uses <MeiliSearchSorting/>. Please note that sorting will only work if you configured your sortable attributes beforehand.
Narrowing down results with facets and filters
Sorting results is nice. But for a huge product catalog, ecommerce websites also need filters to refine search results. That’s what facets are for. Let’s start by adding a refinement list for filtering by product category or brand. Then, we’ll add components to filter by price range and rating.
Facet filter
Let’s update our MeiliSearchFacetFilter.vue component to display a checklist of all the possible values for a given attribute. We’ll make attribute a prop so the component is reusable. In our case we’ll use it for both category and brand. The component code should look like this:
<!-- components/organisms/MeiliSearchFacetFilter.vue -->
<script lang="ts" setup>
import { AisRefinementList } from 'vue-instantsearch/vue3/es'
const props = defineProps<{
attribute: string
}>()
const { attribute } = toRefs(props)
</script>
<template>
<AisRefinementList
:attribute="attribute"
operator="or"
>
<template #default="{ items, refine }">
<BaseTitle class="mb-3 text-valhalla-100">
{{ attribute }}
</BaseTitle>
<BaseCheckbox
v-for="item in items"
:key="item.value"
:value="item.isRefined"
:label="item.label"
:name="item.value"
:disabled="item.count === 0"
@change="refine(item.value)"
>
<BaseText tag="span" size="m" :class="[ item.count ? 'text-valhalla-500' : 'text-ashes-900']">
{{ item.label }} <BaseText tag="span" size="s" class="text-ashes-900">
({{ item.count.toLocaleString() }})
</BaseText>
</BaseText>
</BaseCheckbox>
</template>
</AisRefinementList>
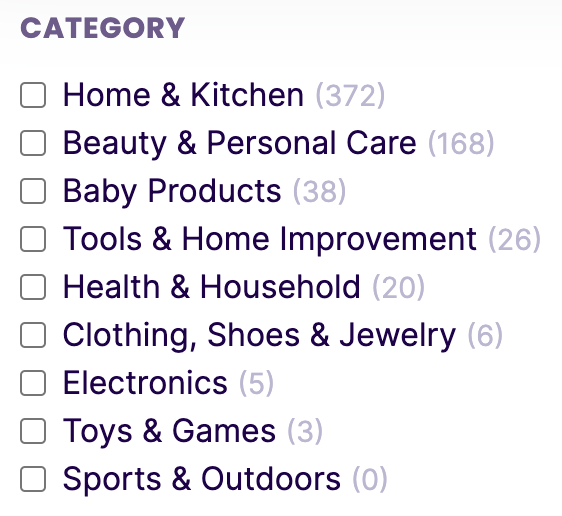
</template>After uncommenting the relevant lines in our HomeTemplate.vue, our application should now display lists of categories and brands. The categories list should look like this:
🆕 Optional – Facet search & sorting facet values
Meilisearch v1.3 introduced two features: searching facet values and sorting facet values.
Search for facet values

Sort facet values by name or count

Check out the MeiliSearchFacetFilter.vue component on the repository's main branch to learn how to implement it.
Price filter
To add a price range filter, we’ll update our MeiliSearchRangeFilter.vue component. We will use our existing RangeSlider component to display a slider allowing users to set a minimal and maximal values:
<!-- components/organisms/MeiliSearchRangeFilter.vue -->

<script lang="ts" setup>
import { AisRangeInput } from 'vue-instantsearch/vue3/es'

interface Range {
  min: number
  max: number
}

const props = defineProps<{
  attribute: string
}>()

const { attribute } = toRefs(props)

const toValue = (currentValue: Range, boundaries: Range): [number, number] => {
  return [
    typeof currentValue.min === 'number' ? currentValue.min : boundaries.min,
    typeof currentValue.max === 'number' ? currentValue.max : boundaries.max
  ]
}
</script>

<template>
  <AisRangeInput :attribute="attribute">
    <template #default="{ currentRefinement, range, refine }">
      <BaseTitle class="mb-3 text-valhalla-100">
        {{ attribute }}
      </BaseTitle>
      <div class="slider-labels text-valhalla-500 mb-2">
        <BaseText size="m">
          <span class="text-ashes-900">$ </span>{{ currentRefinement.min ?? range.min }}
        </BaseText>
        <BaseText size="m">
          <span class="text-ashes-900">$ </span>{{ currentRefinement.max ?? range.max }}
        </BaseText>
      </div>
      <RangeSlider
        :model-value="toValue(currentRefinement, range)"
        :min="range.min"
        :max="range.max"
        @update:model-value="refine($event)"
      />
    </template>
  </AisRangeInput>
</template>

<style scoped>
.slider-labels {
  display: flex;
  justify-content: space-between;
}
</style>
Remove the comment before the corresponding line in HomeTemplate.vue, et voilà!

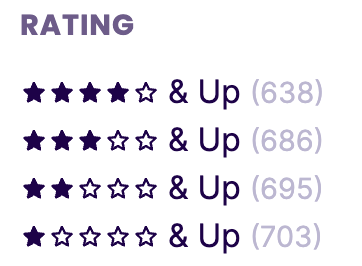
Rating filter
For online shoppers, an useful way of filtering is to remove products below a given average rating, so let’s update our MeiliSearchRatingFilter.vue component to handle this. We’ll use the AisRatingMenu component from vue-instantsearch which has one limitation: it can only use integer values for rating. So we’ll provide it with the rating_rounded attribute instead of rating. Our component will accept two props: attribute and label (optional).
<!-- components/organisms/MeiliSearchRatingFilter.vue -->

<script lang="ts" setup>
import { AisRatingMenu } from 'vue-instantsearch/vue3/es'

const props = defineProps<{
  attribute: string
  label?: string
}>()

const { attribute, label } = toRefs(props)
</script>

<template>
  <AisRatingMenu
    :attribute="attribute"
    :max="5"
  >
    <template #default="{ items, refine }">
      <BaseTitle class="mb-3 text-valhalla-100">
        {{ label ?? attribute }}
      </BaseTitle>
      <a
        v-for="item in items"
        :key="item.value"
        class="rating-link"
        :class="[item.isRefined ? 'text-dodger-500' : 'text-valhalla-500']"
        href="#"
        @click.prevent="refine(item.value)"
      >
        <span class="rating-label">
          <StarRating :rating="Number(item.value)" />
          <BaseText
            tag="span"
            size="m"
            class="ml-1"
          >
            & Up
            <BaseText tag="span" size="s" class="text-ashes-900">
              ({{ item.count.toLocaleString() }})
            </BaseText>
          </BaseText>
        </span>
      </a>
    </template>
  </AisRatingMenu>
</template>

<style src="~/assets/css/components/rating-filter.css" scoped />
And ta-da!
Paginating results
We’ll implement a pagination system to allow users to find results more easily. In an ecommerce scenario, numbered pagination is the recommended approach because it allows users to remember pages, and thus return to them more easily if they want to find a product they’ve seen previously. Let’s update our MeiliSearchPagination.vue component:
<script lang="ts" setup>
import { AisPagination } from 'vue-instantsearch/vue3/es'
</script>

<template>
 <AisPagination>
   <template #default="{ currentRefinement, pages, refine, nbPages, isFirstPage, isLastPage }">
     <!-- First page -->
     <PageNumber
       v-if="!isFirstPage && !pages.includes(0)"
       :has-gap-separator="!pages.includes(1)"
       :is-current="currentRefinement === 0"
       @page-click="refine(0)"
     >
       Page 1
     </PageNumber>
     <!-- Current page and 3 previous/next -->
     <PageNumber
       v-for="(page, index) in pages"
       :key="page"
       :show-separator="index < (pages.length-1)"
       :is-current="currentRefinement === page"
       @page-click="refine(page)"
     >
       Page {{ page + 1 }}
     </PageNumber>
     <!-- Last page -->
     <PageNumber
       v-if="!isLastPage && !pages.includes(nbPages-1)"
       separator="before"
       :has-gap-separator="!pages.includes(nbPages-2)"
       :is-current="currentRefinement === nbPages-1"
       @page-click="refine(nbPages-1)"
     >
       Page {{ nbPages }}
     </PageNumber>
   </template>
 </AisPagination>
</template>
After uncommenting the corresponding line in our HomeTemplate.vue file, we will now see a list of pages below our results. This list will always display the first and last pages, as well as the current one and up to 2 pages before and after it.

And with that, we’ve just completed our ecommerce application. Congratulations for reaching the end of this guide. 🎉
Our final application should look like this:
Wrapping up
Let’s take a look back at what we’ve built:
- A Nuxt 3 ecommerce website
- A Node.js script to initialize our Meilisearch database for ecommerce search
- InstantSearch integrations for searching products and displaying, filtering, and sorting results
All the code is available in the demo repository: https://github.com/meilisearch/ecommerce-demo
The repository main branch contains small differences, like Meilisearch being implemented as a Nuxt Module. This approach will be useful for users looking to implement server-side rendering to improve SEO. For the sake of brevity, advanced topics like server-side rendering and synchronizing state with the router were left out of this guide.
Thanks for reading! I hope this guide was helpful to you. Let me know in our Discord community!
Here are the other ways to get in touch with us:
- Participate in our Product Discussions
- Found a bug? File a Github Issue
- Anything missing? Take a look at our Roadmap