
This guide will walk you through setting up a Next.js storefront for your Shopify commerce. We will use the open-source Enterprise Ecommerce starter developed by Blazity which comes with a CLI to get started in a snap.
Overview
The diagram below gives an overview of the architecture of our application.
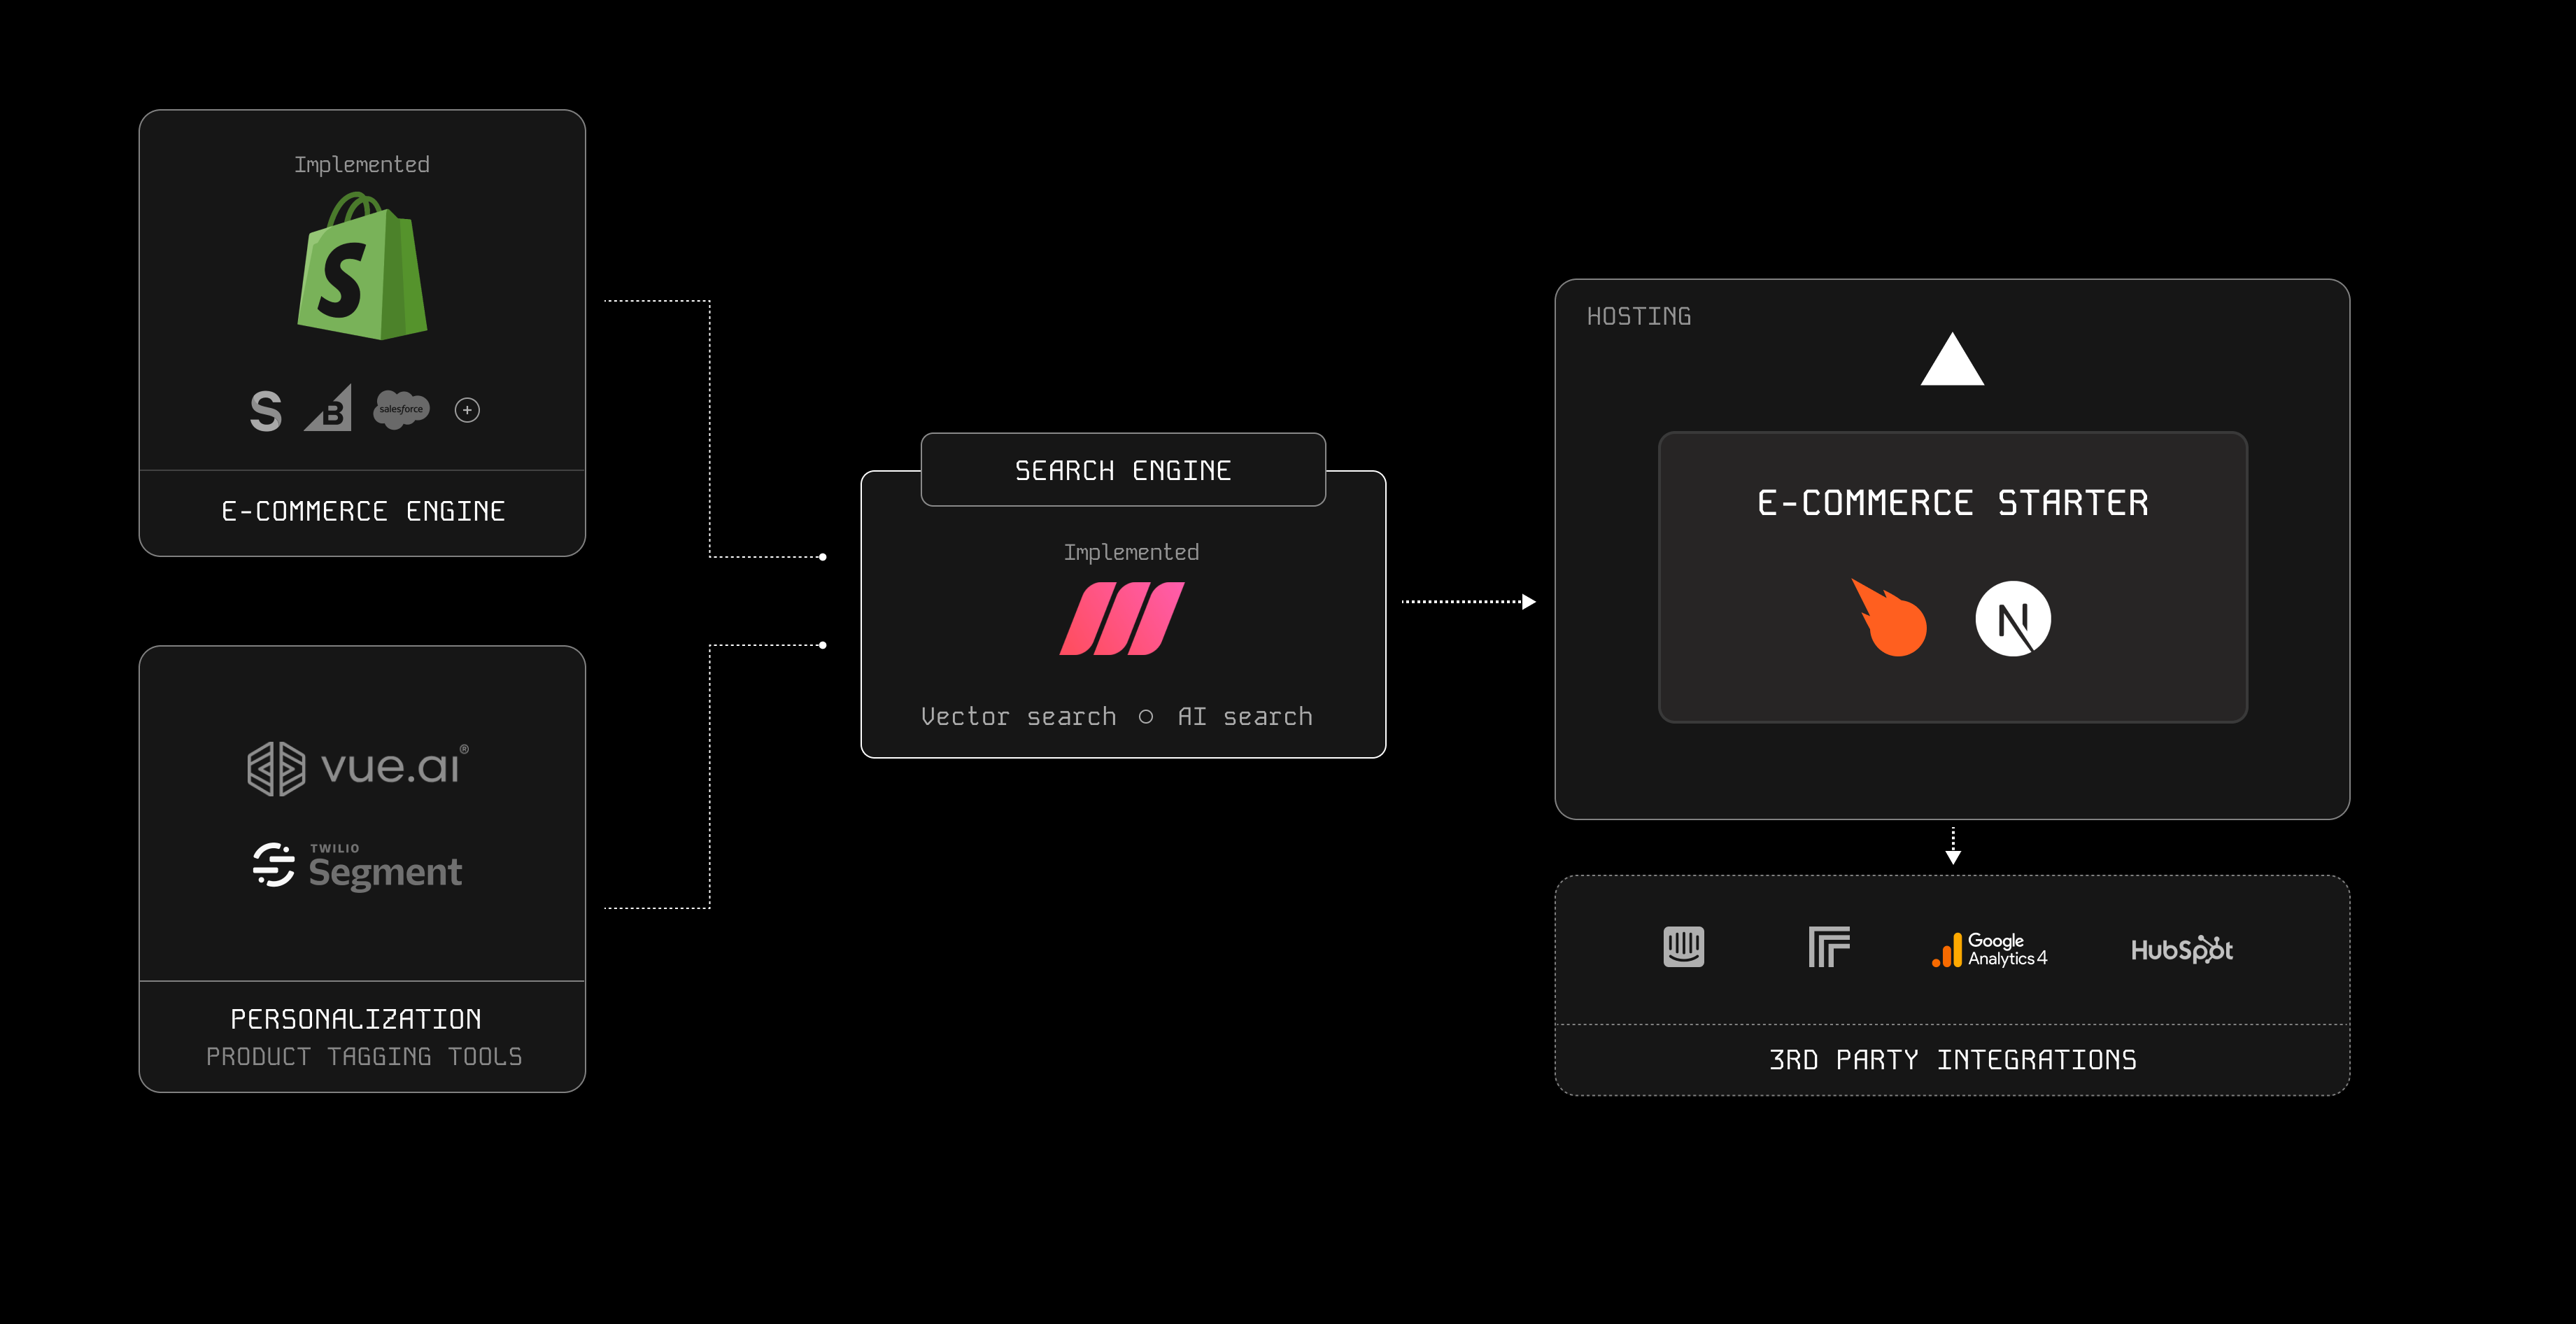
The application stack is composed of 4 key components:
- Data sources — Shopify admin, personalization tools, etc.
- Search engine — Meilisearch
- Full-stack app — Next.js application
- Third-party integrations — Analytics, CRM, etc.
In this architecture, the Meilisearch database aggregates data from multiple sources to make it accessible by the Next.js application.
Our final application will look like this: live preview ✨
Prerequisites
This guide requires:
- Node.js ≥ 20.x
- Yarn ≥ 4.x
- Meilisearch ≥ 1.8
- A Shopify store
Setup
This setup phase provides you with the necessary credentials for your application to interact with Meilisearch and your Shopify store.
These credentials match an environment variable that will be needed during the installation phase. For clarity, this guide will indicate with a "✅" emoji each of these variables.
Creating a Shopify store
If you don’t have one already, go to Shopify and create a new store. Shopify associates a unique ID with each store named the store domain.
To find your Shopify store domain, go to Settings > Domains . Your store domain looks like this: your-domain.myshopify.com.
✅ Shopify store domain
Installing Shopify Headless
In the Shopify Marketplace, find the Headless application and install it. After installation, click on Create storefront.
Then, we will update the API access. In the Manage API access section, click on Manage next to Storefront API.
Edit the Storefront API permissions to add the following:
unauthenticated_read_product_inventoryunauthenticated_read_customer_tags
After saving the permissions, you can copy the private access token.
✅ Shopify app Storefront API Token
Creating a Shopify App
Now, we will create a Shopify App for our store. Shopify Apps allow you to build custom integrations for your store. This app will allow us to get API keys to read and manage data in our Shopify store.
To create a Shopify app:
- Navigate to your store’s Shopify admin dashboard
- Open the store’s Settings and navigate to the Apps and sales channels tab
- Click on Develop apps
- If requested, follow the steps to allow custom app development for your store
- Create an app and enter a name, e.g., “Next.js App”
After creating your app, navigate to the API credentials tab to find your Shopify app’s API key (not the API secret key!)
✅ Shopify app API key
Configuring the Shopify Admin API key
Shopify apps work with a set of two keys:
- An admin API key — to manage the Shopify admin, e.g., to edit your product catalog
- A storefront API key — to read the product catalog, create carts, etc.
We can configure the access scopes for these API keys in your Shopify app’s Configuration tab. In this section, we will enable the required scopes for our Admin API key.
To configure the scopes for the Admin API key, follow these steps:
- In the Admin API integration section, click on Configure
- Enable the following scopes:
write_product_listingsread_product_listingsread_productswrite_products
- Under Webhook subscriptions, select the 2024-01 API version
- Save :)
With our tokens API scopes defined, we can return to the API credentials tab and install our app. Click Install app to generate your API access tokens.
After installing your Shopify app, you will have access to your Admin API access token. For security reasons, this token will only be revealed to you once—make sure to save it.
✅ Shopify app Admin API token
Creating your Meilisearch database
Meilisearch is an open-source search engine that provides full-text, vector, and hybrid search capabilities. Our Shopify products data will be synced with Meilisearch, enabling the front-end app to get fast, relevant search results for end users.
If you don’t have one, create a Meilisearch Cloud account. If necessary, you can first learn how to get started with Meilisearch Cloud.
First, create a new Project, e.g., Shopify store. This will create a new Meilisearch database and should take a few seconds to complete.
Then, you can navigate to your project’s Settings page to find your Database URL (your host) and Default Admin API Key.
✅ Meilisearch host URL
✅ Meilisearch API token
Configuring your Meilisearch
After creating your database, we will create the indexes. You can choose any names for them, but you’ll have to configure your environment variables accordingly. Let’s create two indexes:
- An index for our products, e.g.,
products - An index for our product categories, e.g.,
categories
✅ Meilisearch Products Index Name
✅ Meilisearch Categories Index Name
With our indexes created, we can now configure them. Meilisearch defaults will work well for most settings. For each index, we will only configure the filterable attributes and sortable attributes.
Product index — Filterable attributes
[
	"collections",
	"collections.handle",
	"collections.id",
	"flatOptions",
	"handle",
	"minPrice",
	"tags",
	"variants.availableForSale",
	"vendor",
	"hierarchicalCategories",
	"hierarchicalCategories.lvl0",
	"hierarchicalCategories.lvl1",
	"hierarchicalCategories.lvl2",
	"avgRating"
]
Product index — Sortable attributes
[
	"minPrice",
	"updatedAtTimestamp",
	"avgRating"
]
Categories index — Filterable attributes
[
	"handle",
	"id"
]
You can leave all other attribute settings to their default value.
Installation
With all credentials in hand, we’re ready to launch the installation wizard. Let’s create our project using Blazity’s commerce CLI.
# with NPM
npm create commerce

# with Yarn
yarn create commerce
The first prompt will ask you to select the services to enable. For this guide, we’ll only enable the defaults: Shopify and Meilisearch.
Then, the CLI will ask for a series of credentials. If you followed the Setup section, you should already have all the necessary credentials. After providing all the credentials, the CLI will scaffold your project in a new folder.
After creation, navigate to your project directory. Your apps/web/.env.local should look like this:
# apps/web/.env.local

SHOPIFY_STOREFRONT_ACCESS_TOKEN=shpat_a-very-long-token
SHOPIFY_ADMIN_ACCESS_TOKEN=shpat_another-very-long-token
SHOPIFY_STORE_DOMAIN=your-domain.myshopify.com
SHOPIFY_APP_API_SECRET_KEY=a-32-characters-long-api-key
SHOPIFY_HIERARCHICAL_NAV_HANDLE=hierarchical-categories
MEILISEARCH_PRODUCTS_INDEX=products
MEILISEARCH_CATEGORIES_INDEX=categories
MEILISEARCH_ADMIN_KEY=your-meilisearch-admin-api-key
MEILISEARCH_HOST=https://edge.meilisearch.com
LIVE_URL=https://your-domain.myshopify.com
FLAGS_SECRET=randomly-generated-secret
CRON_SECRET=another-randomly-generated-secret
Syncing Meilisearch and Shopify
Blazity provides a CLI for synchronizing the data between your Shopify and Meilisearch. In this section, we will see how to achieve that using commerce-cli.
To sync your Shopify data with your Meilisearch, navigate to your project folder and run:
npx commerce-cli@latest syncThis command will pull all the necessary data from your Shopify store and sync it into your Meilisearch database.
commerce-cli package can assist you in configuring webhooks to keep your Meilisearch in sync at all times.Starting your app
After initializing your application and syncing the data between Shopify and Meilisearch, you are ready to start your application.
To start your application in development mode, run:
# with NPM
npm run dev

# with Yarn
yarn dev
And that’s it! You can visit your application at http://localhost:3000 🎉
You can also consult a live example here: https://commerce.blazity.com/
Going further
This guide doesn’t cover all available features in the Blazity template. For more advanced configurations, you can learn how to set up hierarchical categories, implement highly scalable redirects, and more on Blazity documentation.
Additionally, here are resources to help you integrate your new Shopify store with Meilisearch and Next.js:
Stay in the loop of everything Meilisearch by subscribing to our monthly newsletter. To learn more about Meilisearch's future and help shape it, take a look at our roadmap and participate in our product discussions.
For anything else, join our developers community on Discord.