
Nikita is a Node.js toolkit for automating deployment workflows. Even though we think it is great, we noticed Nikita's documentation website doesn’t really give users a way to quickly search and find the information they’re looking for. Nikita's content is open source and the documentation website is built with Gatsby, though, so we decided to take the opportunity to show you how to add a nice search interface to a Gatsby-based project.
In this tutorial we will install Meilisearch together with a few other dependencies. Then, we will clone Nikita’s Gatsby repository and index Nikita’s docs with Meilisearch. Finally, we’ll add a search UI to our local version of Nikita’s docs.
You can check the finalized code, including all content ready to be run in a server, at this github repo.
Setup
Before we begin, let’s take a quick look at everything you need to follow this tutorial.
Introducing our Tools
Gatsby
Gatsby is a React-based open-source framework used for Static Site Generation (SSG). It combines the functionality of React, GraphQL and Webpack and provides great performance, scalability, and security right out of the box.
Requirements
To be able to follow this tutorial, you'll need the following:
- An open terminal or command prompt
- Node.js >= 14.15.X and <= 16.X: this makes it possible to run JS outside a browser
- You can check your active version with the command
node --version - If your version of Node is outside this range, we recommend that you install nvm and use it to access Node 14
- You can check your active version with the command
- Yarn >= 1.22 : Yarn is a package manager that doubles down as project manager
- Docker: Docker will help us create a working development environment with relatively little effort
Steps
- Start Meilisearch
- Setup the Gatsby project
- Add the Meilisearch plugin
- Add the content of the Gatsby app to Meilisearch
- Build the frontend
Start Meilisearch
There are multiple ways to download and run a Meilisearch instance. For this guide, we'll be using Docker. Want to avoid a local installation? Try our Meilisearch cloud with a free 14-day trial!
After installing Docker in your machine, fetch and run the latest Meilisearch container image. To do that, open your terminal and use the following commands:
docker pull getmeili/meilisearch:latest
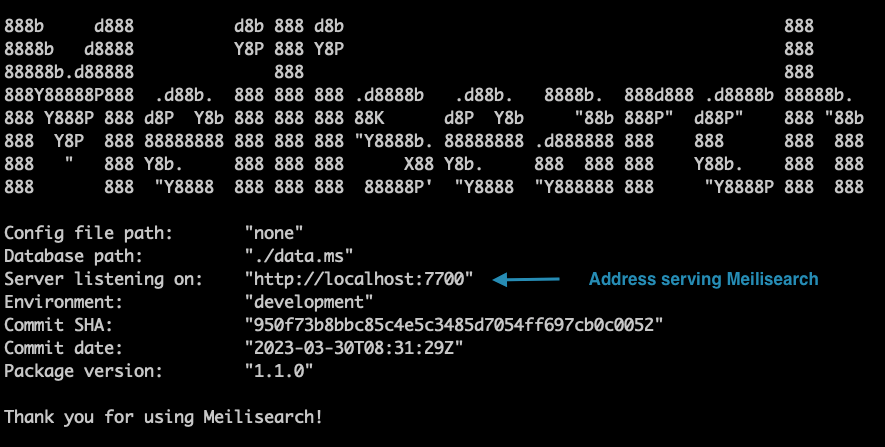
docker run -it --rm -p 7700:7700 getmeili/meilisearch:latest ./meilisearch --master-key=masterKey
Meilisearch will start running on http://localhost:7700. If everything went well, you should see something like this in your terminal window:
Setup the Gatsby project
With Meilisearch ready, it’s time to download Nikita’s documentation.
In another terminal window, navigate to your working directory, then clone the Nikita project that we will be using for this guide:
git clone https://github.com/adaltas/node-nikita.git
You can find the content of the Gatsby app in the markdown files inside the docs/content folder. This is the data Gatsby uses to generate Nikita’s documentation.
 |
|---|
| Directory structure for the node-nikita project |
Add the Meilisearch plugin and launch Gatsby
Alright: both Meilisearch and Gatsby are installed. We will start by installing all the project dependencies. Run the following command in your terminal:
cd node-nikita/docs/website
yarn
Once that is done, we will install the official Meilisearch plugin for Gatsby with Yarn:
yarn add gatsby-plugin-meilisearch
Great! We’re ready to launch Gatsby. To do that, just run the following command on your console:
yarn develop
This is how the UI of the Nikita docs website looks like:

Add the content of the Gatsby app to Meilisearch
Now that we have installed the plugin and have both the Gatsby app and the Meilisearch instance running, things start to get interesting! Let's configure gatsby-meilisearch-plugin to make the content searchable.
The main code for the docs website lies in the directory docs/website.
Configure the plugin
The first thing we need to do is add your Meilisearch credentials to the Meilisearch Gatsby plugin. Open docs/website/gatsby-config.js and add this bit of code at the bottom of the plugins array:
{
    resolve: 'gatsby-plugin-meilisearch',
    options: {
      host: 'http://localhost:7700', // your host URL goes here
      apiKey: 'masterKey',   // your API key goes here
      indexes: [],
    },
  },
So far, our configuration tells the plugin where to find our Meilisearch instance and gives it the credentials to read the content inside Gatsby. Now we need to define what data we want to add to Meilisearch and how. This happens in the indexes field. This field can be considered the heart of the Gatsby Meilisearch plugin.
The indexes field is an array composed of multiple index objects. Each index object must contain the following fields: indexUid, query, and transformer. Let's examine these fields.
indexUid
This field contains the name of a Meilisearch index. For this guide, we will use nikita-api-docs:
indexUid: 'nikita-api-docs'
query
This field contains the GraphQL query the plugin will use to fetch content from Nikita’s documentation. Gatsby comes with inbuilt support for GraphQL—it even includes a bundled GraphQL tool, accessible on (http://localhost:8000/___graphql). You can read more about GraphQL on the project’s official documentation.
Our query looks like this.
query: `query MyQuery {
    allMdx {
      edges {
        node {
          frontmatter {
            title
            navtitle
            description
          }
          slug
          rawBody
          id
        }
      }
    }
  }`,
In this query, we first say we are only interested in the markdown files by wrapping our query with the allMdx statement. We can do that thanks to two very useful tools: gatsby-plugin-mdx and gatsby-source-filesystem.
Then, we specify which document fields we want to include in our index: title, navtitle, description, slug, id, and, finally, rawBody—that is, the document’s raw markdown content.
transformer
This is the last configuration field. It gets the data we fetched from Gatsby with our query and converts it into a format that Meilisearch will understand.
In our case, the data will look a bit like this:
data = {
    allMdx: {
        edges: [
          {
            node: {
              frontmatter: {
                title: "Introduction",
                navtitle: "intro",
              },
              body: "Introduction to the Nikita.js",
              slug: "/introduction",
              id: "1",
            },
          },
          {
            node: {
              frontmatter: {
                title: "Architecture",
                navtitle: "architecture",
              },
              body: "Architechture of Nikita.js",
              slug: "/architecture",
              id: "2",
            },
          },
        ],
    },
};
This data looks great, but is not in a format that Meilisearch can easily understand. We can change that by adding a parser function to transformer:
transformer: (data) => {
    data.allMdx.edges.map(({ node }) => {
      // Node property has been destructured here
      return {
        id: node.id,
        lvl0: node.frontmatter.title,
        lvl1: node.frontmatter.navtitle,
        content: node.body,
        anchor: node.slug,
      };
    });
}
With that, gatsby-plugin-meilisearch will get the raw data we extract with our query and turn the whole object into an array.
 // It will return a list of transformed structured object

[
    {
      id: "1",
      lvl0: "Introduction",
      lvl1: "introduction",
      content: "Introduction to the Nikita.js",
      anchor: "/introduction"
    },
    {
      id: "2",
      lvl0: "Architecture",
      lvl1: "architecture",
      content: "Architechture of Nikita.js",
      anchor: "/architecture"
    }
]
Putting it all together and finalizing plugin configuration
If you’ve been following along, the gatsby-plugin-meilisearchconfiguration at the end of your docs/website/gatsby-config.js should look something like this now:
{
  resolve: 'gatsby-plugin-meilisearch',
  options: {
    host: 'http://localhost:7700',
    apiKey: 'masterKey',
    batchSize: 1,
    indexes: [
      {
        indexUid: 'nikita-api-docs',
        settings: {
          searchableAttributes: ['lvl0', 'lvl1', 'lvl2', 'content'],
        },
        transformer: (data) =>
          data.allMdx.edges
            .filter(
              ({ node }) =>
                node.slug.search('guide') !== -1 ||
                node.slug.search('project') !== -1 ||
                node.slug.search('api') !== -1
            )
            .map(({ node }) => {
              // Have to update for versioning
              const currentVersion =
                node.slug.substring(0, 8).search('project') === -1
                  ? '/current'
                  : ''

              return {
                id: node.id,
                lvl0:
                  node.frontmatter.navtitle || node.frontmatter.title || '',
                lvl1:
                  node.frontmatter.title || node.frontmatter.navtitle || '',
                lvl2: node.frontmatter.description || '',
                content: node.rawBody,
                url: `${currentVersion}/${node.slug}`,
              }
            }),
        query: `query MyQuery {
            allMdx {
              edges {
                node {
                  frontmatter {
                    title
                    navtitle
                    description
                  }
                  slug
                  rawBody
                  id
                }
              }
            }
          }`,
      },
    ],
  },
},
We began gatsby-plugin-meilisearch configuration by adding basic data and credentials to docs/website/gatsby-config.js.
We continued configuration by specifying the content we want to search should be added to the nikita-api-docs index, used a GraphQL query to select content for indexation, and finally used a transformer function to format the data for indexation.
Build the project
The gatsby-plugin-meilisearch will fetch and send data for indexation to Meilisearch during the build process. To get that started, run the following command:
yarn build
You should see a message in the terminal once your content is being indexed:
success gatsby-plugin-meilisearch - 0.920s - Documents are send to Meilisearch, track the indexing progress using the tasks uids.
You can verify this by going to http://localhost:7700, entering your API key, and checking that Nikita’s documentation has been added to Meilisearch.
Build the frontend
Now that the data is indexed, let’s build the user interface and create a great search experience for our end-users.
For this example, we will use docs-searchbar.js. It is a front-end SDK for Meilisearch that provides an easy way of integrating a search bar into our documentation site.
Add the search bar component
Let’s start by installing docs-searchbar.js in the frontend directory of the project.
# With Yarn
yarn add docs-searchbar.js
With that done, we can import the docs-searchbar module into website/src/components/shared/AppBar.js by adding this to the top of the file:
import 'docs-searchbar.js/dist/cdn/docs-searchbar.css'
Next, we need to add a useEffect hook to add the docsSearchBar function to AppBar.js. Add this below the other useEffect hook:
useEffect(() => {
    if(window !== undefined){
      const docsSearchBar = require('docs-searchbar.js').default

      docsSearchBar({
        hostUrl: 'http://localhost:7700',
        apiKey: 'masterKey',
        indexUid: 'nikita-api-docs',
        inputSelector: '#search-bar-input',
        meilisearchOptions: {
          limit: 5,
        },
        enhancedSearchInput: true,
      })
    }
  }, [])
The docsSearchBar function comes in with a number of different parameters:
hostUrlandapiKeyallows the search bar to access your Meilisearch instance.indexUidtells the search bar which index it should search through.inputSelectoris a selector matching the HTML element where our users will type their queries. In our case, that’s#search-bar-input. Don’t worry, we’ll add this element to Gatsby in a moment.- Finally,
enhancedSearchInputtellsdocs-searchbarto apply a theme to the search box, improving its appearance and making it a bit more user-friendly.
All that’s left is adding our search element in website/src/components/shared/AppBar.js. Remember to use the same id we configured as the inputSelector. Add the element after </Link> tag:
<input type="search" id="search-bar-input" />
And that’s it! We’re done!
Test the implementation
Ready to see all this hard work in action? On your terminal, re-run the following command:
yarn develop
And then use your browser to access http://localhost:8000. You should see your local copy of NikitaJS’s docs with a brand new search bar:

Conclusion
We hope this article was a pleasant introduction to the new Meilisearch plugin for Gatsby!
If you have any questions, please join us on Discord. For more information on Meilisearch, check out our Github repository and our official documentation.